After a long period of inactivity (a new day job kinda took over for a while there), I've started creating again recently and have been prompted to create a Facebook page as an easy way to share what's new. Here are a couple of pieces I created on the weekend.
Showing posts with label new pieces. Show all posts
Monday, October 27, 2014
Thursday, August 29, 2013
Recent creations
"Solara" earrings. Gold tone filigree frames, imitation amber and miyuki drop beads.
"Eden" earrings. Silver tone hoops, czech glass leaves and assorted beads.
Tuesday, July 10, 2012
Losing time
Monday, June 11, 2012
The Church of Adornment online store goes live
It's alive! Finally! My very own jewellery store, that is.
Two years ago I enrolled in a night course to make silver jewellery, purely with the intention of making myself one piece. From that moment, hunched over a jeweller's peg in a high school classroom, something changed. I discovered that not only do I love making jewellery, but apparently I have some talent for it.
This is just a small beginning, but it's something. And I hope it will lead to bigger things, more opportunities to bring beauty into the world. Because that's what creating is about, ultimately. So here it is: the Church of Adornment store on MadeIt.
Friday, June 8, 2012
Jewellery renovation: the Renata necklace
I recently purchased 2 bracelets on sale with the intention of pulling them apart and turning them into a necklace. The beads look like they're just a synthetic resin over a shell-look background, but in lovely bright pink and purple tones.
The bracelets were not making the best use of the beads. I found the teardrop shapes unflattering with the points alternating, and the design made them look cheap. They were threaded on elastic strings and closed with a basic knot, so they were easy to dismantle.
The first thing I did was to organise the beads in order of colour and size, as some were slightly thicker than others and some had more intense colours, or more of one colour than the other. I arranged them in a graduated curve ready for assembly into a necklace.
I then spent what was probably a couple of hours pairing them with different coloured spacer beads, trying different layouts, and trying to come up with a pleasing, balanced design. I strung the beads on tiger tail wire and placed crimping beads in a couple of different places to ensure strength.
I'm quite pleased with the end result, and I think it's a vast improvement on the original bracelets. I call it the Renata necklace. Renata is a name with Latin origins and means 'reborn'.
Saturday, May 26, 2012
All in a day's work
These are the results of the jewellery course I went to last weekend at Ku-ring-gai Art Centre.
![]() |
Coral-textured pendant with dichroic glass cabochon |
![]() |
Silver leaf imprint |
These are made by painting layers of precious metal paste onto a real leaf. Each layer must be completely dry before the next is applied. Then they are fired in a kiln. The leaf and the binding clay burn away, leaving pure silver.
I finished this by tracing the major vein lines with a burnishing tool, then burnishing a few raised parts of the leaf randomly. I haven't made this into a piece of jewellery yet. I think I might try to solder a pin to the back to make a brooch.
![]() |
Open ring - textured PMC. |
![]() |
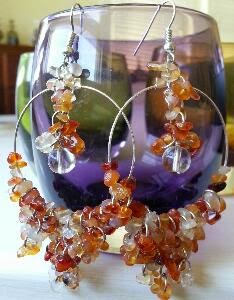
Earrings for an autumn saunter |
I'm still undecided about using PMC as a medium on a regular basis. It's certainly much quicker to work with than sterling silver sheet and wire, but the nature of a clay-based medium means it's also harder to be precise.
But the workshop was great, worth every penny. Just as it did the last time I made silver jewellery, I was barely aware of time passing. I was happy, well and truly 'in the zone'. It was a good reminder of why I want to find a way to make jewellery all the time.
Subscribe to:
Posts (Atom)